WordPress/Jetpack Driver for Laravel Valet

Recently I’ve found myself using Laravel Valet for local PHP development on my Mac. I love how fast and low-maintenance it is.

One thing that is a little tricky about Valet is that you can’t really write custom Nginx configs. That means that I couldn’t use my favorite technique of routing missing images to the production site, via Jetpack’s Site Accelerator (formerly “Photon”) CDN.

Normally, when doing local development on a WordPress site, you need three things: the codebase, a copy of the database, and the wp-content/uploads directory. But if you just redirect missing image files to your production site, you don’t need to laboriously copy all those files and clutter up your local machine.

I found myself really missing that technique today, so I wrote a driver for Laravel Valet that handles it!

You can get it here: WordPress Jetpack Valet Driver.

Page Links To v3.0

Today I pushed an update to my redirect and repointing plugin, Page Links To. Tomorrow, this plugin will have been in the WordPress.org Plugin Directory for 13 years (it was the 339th plugin in the WordPress plugin repository; there are now over 75,000!).

To celebrate its transition to a teenager, I’ve added some new features and UI enhancements.

Last month, I received survey responses from over 800 Page Links To users and learned a lot about how it’s being put to work. One of the most interesting things I found was how many people are using it for URL redirects. For example, they might have a really long URL on their own site or someone else’s site that they want to be nice. example.com/summer-sale instead of example.com/store/specials.aspx?season=summer&_utm_source=internal. But in order to create these redirects, you have to go through the cluttered and sometimes slow post creation screen. All you really need to create a redirect is a title, a destination URL, and a local short URL.

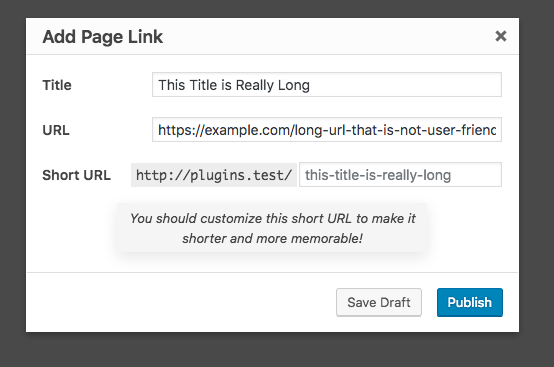
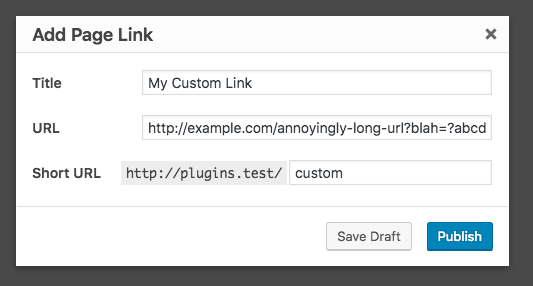
You’ll now find a menu item “Add Page Link” that will allow you to quickly add a redirected Page without having to wait for the entire WordPress post editing interface to load. It’s super fast, and it doesn’t redirect you away from the screen you’re on.

Since short URLs are better for sharing (and remembering), the UI will give you a little push to shorten the URL if the one generated from your title is too long. From there, you can Save Draft or Publish.

Hey, that URL is getting a bit long

Custom slug, for a better short URL

Additionally, this release includes a “link” indicator on post and page list screens, so you can easily see what items have been re-pointed with Page Links To. When hovered, the link icon will reveal the destination URL for a quick view.

The “link” icon means that this item has been pointed elsewhere.

If you want to grab the “local” short URL (which will be redirected to your chosen URL when someone visits it), just click “Copy Short URL” from the actions, and it’ll be in your clipboard.

Hover the “link” icon to see where it’s pointing.

That’s it for version 3.0, but I’ll have more to announce soon — stay tuned!

Making ScoutDocs: Build Tools

Continuing my series about ScoutDocs and the process of building it, this week I’m talking about Build Tools.

ScoutDocs-plugin-header-1544x500What is ScoutDocs? ScoutDocs is a WordPress plugin that adds simple file-sharing to your WordPress site.

Coding in React involves JSX, a bizarre-but-wonderful XML syntax that you dump directly into the middle of your JavaScript code. It feels exquisitely wrong. Browsers agree, so your JSX-containing JS code will have to be transpiled to regular JavaScript. This can involve using a complex maze of tools. Babel, NPM, Webpack, Browserify, Gulp, Grunt, Uglify, Uglifyify (yes, you read that right), and more. You have decisions to make, and you will find fierce advocates for various solutions.

For ScoutDocs, I decided to go with Grunt for task running, because I was already comfortable with it, and I needed it for grunt-wp-deploy. Use a task runner you are already comfortable with. Even if it is just NPM scripts. You’re learning a lot of new things already. It’s okay to keep your task runner setup.

Next, I had to choose a JS bundler which would let me write and use modular code that gets pulled together into a browser-executable bundle. After deliberating between Webpack and Browserify, I chose Browserify. Webpack is really complicated. It is also very powerful. I recommend you avoid it until you need it. I haven’t needed it yet, and found Browserify to be easier to configure and use, even though it’s a bit on the slow side.

As I was building ScoutDocs and tweaking my dev tools, tweaking my Grunt file, and writing code to search/replace strings etc, I began to feel like the time I was spending too much time on tooling. Was I becoming one of those people who spend all their time listening to productivity podcasts instead of… being productive? I can see how someone could get sucked into that trap, but putting a reasonable amount of time into configuring your development tools can pay dividends for you beyond simply the time saved. It can also prevent mistakes, keep you in coding mode more often, and increasing your confidence in your code builds. Spend the time up front to make your tools work for you.

Other posts in this series:


Making ScoutDocs: React

Continuing my series about ScoutDocs and the process of building it, this week I’m talking about React.

ScoutDocs-plugin-header-1544x500What is ScoutDocs? ScoutDocs is a WordPress plugin that adds simple file-sharing to your WordPress site.

After the first iteration of ScoutDocs was built and none of the partners on the project were happy with its experience, it became clear that in order to deliver a clean, simple interface for file uploading and sharing we needed to leave the bounds of the WordPress admin. It didn’t take me long to decide that React would be the tool I used to build the new interface.

There is an incredible momentum behind React, and a rich ecosystem of libraries, tools, and educational resources. But beyond all that, React is just plain fun to code. Once you accept the central premise that a view layer and the controller that handles that view are inextricably linked, and once you get over the weirdness of quasi-HTML-in-JS that is JSX, coding in React is a joy.

Screen Shot 2018-06-10 at 10.19.07 PM.png

Make no mistake, learning React is not a weekend project. It will take a while before it feels like home. But once you get it, you feel very powerful.

The first lesson I learned was don’t learn React by rewriting your app in React. I tried this. I read some tutorials about React and it felt straightforward, and I was like “let’s do this.”

confused.gif

This was a bad idea. I was overwhelmed. I had no idea where to start. Next, I tried following some of the interactive tutorials that required me to build a simple React app and then slowly add functionality to it, refactoring it multiple times, until I understood not just the code that I ended up with, but the process of creating it. This went much better.

Start small, and build a bunch of “toy” apps before you use React for your own apps. Once you are able to “think in React”, you’ll be nearly physically itchy to go re-code your app in React, and that’s how you know you’re ready. If you jump the gun, you are going to get stuck a lot, and it will be frustrating.

As you learn React and explore the React ecosystem, you will likely hear about Redux, which is a system for storing application state, and is commonly used with React apps. It looked complicated, and even its creator wrote a post saying you might not need Redux. So I skipped it. This was probably the right call when I was starting out. But as I fleshed out the ScoutDocs app and its complexity increased, I ran into a problem.

See, React breaks your app up into these nested chunks of UI and functionality called components. Data flows down through your components. So if a user updates their name, that change will flow down from higher up components like a Page component down to a PageHeader, down to a NavBar, down to a UserStatus. Once this is all set up and you update data in a parent component, the changes automatically flow downstream, and the UserStatus component updates and re-renders. It’s great. Except that there are a bunch of intermediate components that accept and “forward” that user name data to their children, without actually caring about it themselves. When you inevitably refactor something and need to add new data that flows through these components, every single intermediate one needs to be updated to pass it on. It is tedious. You will hate it.

Worse, because events in React flow upwards, if a user updates their name in the UserName component, that change needs to flow up to ProfileForm, up to Profile, up to Page, and then up to your main App component. When you refactor, you need to make sure this event forwarding chain stays connected. Yet more tedium that you will hate.

Redux solves this by letting your React components, no matter how deeply they are nested, subscribe directly to the data they need.

I really wish Dave Ceddia had written this excellent post about Redux two months earlier.

If you have a component structure like the one above – where props are being forwarded down through many layers – consider using Redux.

This is what I needed to hear, and knowing this would have saved me a lot of frustration and time that I now have to spend converting ScoutDocs to use Redux.

Use Redux when your React data flow starts to get unwieldy.

Another mistake I made early on was making the data my React components accepted too restrictive. For example, I wanted the ability to prefix a Row component with a clickable icon. So I let the component accept an icon and onClickIcon property. I just passed a Font Awesome icon name in, and a function I wanted to run when clicked. It worked great.

Screen Shot 2018-06-10 at 10.26.08 PM.png

Then I needed to add a second icon in front, in some circumstances. Ugh. I certainly didn’t want to do otherIcon and onClickOtherIcon. Instead, what I should have done was let the component accept beforeRow which could be anything… like an array of <Icon> components or a single one or even other components altogether.

Screen Shot 2018-06-10 at 10.31.45 PM.png

This can be used for many more situations than the one (“put an icon before the row”) that I’d originally envisioned.

Your React components should be flexible, so they can be reusable.

Other posts in this series:

  • Outsourcing
  • React
  • WordPress Rest API
  • PHP 7
  • Build tools
  • Unit testing

Lessons Learned Making ScoutDocs: Outsourcing

Now that ScoutDocs is in the WordPress plugin repository, I’d like to share some lessons I learned making it. Every project teaches me something — this one taught me a lot.

ScoutDocs-plugin-header-1544x500What is ScoutDocs? ScoutDocs is a WordPress plugin that adds simple file-sharing to your WordPress site. You can upload files (which are stored securely in the cloud and served over HTTPS via a global CDN), and share them with individuals or groups of individuals. Email notifications are also handled by the ScoutDocs service, getting around the issue of reliable email delivery on a shared host. You can require that recipients accept or decline the files you’ve shared, e.g. so you can see which of your employees has seen the new employee handbook. Instead of files living as email attachments (if they even fit) or off on some third-party site, people can access them on your site.

In this weekly series, I’m going to cover:

  • Outsourcing
  • React
  • WordPress Rest API
  • PHP 7
  • Build tools
  • Unit testing

First up, lessons learned about outsourcing.

When we started making ScoutDocs, the question was raised as to whether it would be beneficial to outsource any of the coding. My time was valuable and limited, so I figured that if I had another developer code while I slept, I could spend an hour in the morning reviewing the code and giving them direction for the next workday. I had visions of quickly scanning code while my morning coffee brewed, twirling an invisible moustache, and muttering “good, good.”

This is not what happened.

The issue I quickly ran into was that for any nebulously defined problem, someone else’s solution was unlikely to match what I wanted. Their assumptions would not be the same as mine. As a result, the odds of me being happy with their solution were very low.

I spent a lot of time rewriting code.

And because I was spending all my time “fixing” the code I wasn’t really looking at the product as a whole.

When the contractors were done, my ScoutDocs partners and I looked at it, and we realized that it… was bad. Forget code quality, which despite all my vain reshuffling was still lacking: what we had was just overall a terrible user experience. Rather horrifyingly, we admitted that what we needed to do to give it the user experience we wanted was nothing short of a total rewrite.

demo.gif

I rolled up my sleeves, learned React, and rewrote ScoutDocs until almost nothing of the original code and user experience remained.

So was outsourcing a waste? Not completely. Some code was retained, mostly relating to the Amazon S3 interface. I was glad that someone else had experienced the singular joy of spending an eternity lost in a maze of Amazon Web Services documentation and confusing code samples. Additionally, if I had set out to build the initial version of the code, it would have taken a lot of my time (which I did not have much to spare), and might have meant that our horrifying realization would have been delayed for several months.

Knowing what doesn’t work is valuable, even if you have to throw it away. That’s mostly what we had gotten for our money: figuring out what didn’t work. If outsourcing can get you to these realizations sooner or for less money, it might be well worth it.

As I rewrote the software, my partners asked me a few times if I regretted outsourcing. I didn’t, for the above reason, but also because outsourcing had solved some of the coding issues that would have been a slog for me. However, if I was doing it all over again, I would have done more work upfront to identify specific, well-defined tasks that I wanted to outsource.

Delegation makes sense when the task is well-defined. At the extreme, you could spend so much time redoing work and asking for revisions that you’d have been better off just doing it yourself. If you can specify exactly what constitutes success in a task, and the time it takes you to specify that is much less than the time it would take you to do the task, outsource it.

Check back next week for my thoughts on rewriting ScoutDocs in React.

Handling old WordPress and PHP versions in your plugin

New versions of WordPress are released about three times a year, and WordPress itself supports PHP versions all the way back to 5.2.4.

What does this mean for you as a plugin developer?

Honestly, many plugin developers spend too much time supporting old versions of WordPress and really old versions of PHP.

It doesn’t have to be this way. You don’t need to support every version of WordPress, and you don’t have to support every version of PHP. Feel free to do this for seemingly selfish reasons. Supporting old versions is hard. You have to “unlearn” new WordPress and PHP features and use their older equivalents, or even have code branches that do version/feature checks. It increases your development and testing time. It increases your support burden.

Economics might force your hand here… a bit. You can’t very well, even in 2018, require that everyone be running PHP 7.1 and the latest version of WordPress. But consider the following:

97% of WordPress installs are running PHP 5.3 or higher. This gives you namespaces, late static binding, closures, Nowdoc, __DIR__, and more.

88% of WordPress installs are running PHP 5.4 or higher. This gives you short array syntax, traits, function-array dereferencing, guaranteed <?= echo syntax availability, $this access in closures, and more.

You get even more things with PHP 5.5 and 5.6 (64% of installs are running 5.6 or higher), but a lot of the syntactic goodness came in 5.3 and 5.4, with very few people running versions less than 5.4. So stop typing array(), stop writing named function handlers for simple array_map() uses, and start using namespaces to organize and simplify your code.

Okay, so… how?

I recommend that your main plugin file just be a simple bootstrapper, where you define your autoloader, do a few checks, and then call a method that initializes your plugin code. I also recommend that this main plugin file be PHP 5.2 compatible. This should be easy to do (just be careful not to use __DIR__).

In this file, you should check the minimum PHP and WordPress versions that you are going to support. And if the minimums are not reached, have the plugin:

  1. Not initialize (you don’t want syntax errors).
  2. Display an admin notice saying which minimum version was not met.
  3. Deactivate itself (optional).

Do not die() or wp_die(). That’s “rude”, and a bad user experience. Your goal here is for them to update WordPress or ask their host to move them off an ancient version of PHP, so be kind.

Here is what I use:

View code on GitHub


<?php
/**
* Plugin Name: YOUR PLUGIN NAME
*/
include( dirname( __FILE__ ) . '/lib/requirements-check.php' );
$your_plugin_requirements_check = new YOUR_PREFIX_Requirements_Check( array(
'title' => 'YOUR PLUGIN NAME',
'php' => '5.4',
'wp' => '4.8',
'file' => __FILE__,
));
if ( $your_plugin_requirements_check->passes() ) {
// 1. Load classes or define an autoloader.
// 2. Initialize your plugin.
}
unset( $your_plugin_requirements_check );

view raw

plugin.php

hosted with ❤ by GitHub


<?php
class YOUR_PREFIX_Requirements_Check {
private $title = '';
private $php = '5.2.4';
private $wp = '3.8';
private $file;
public function __construct( $args ) {
foreach ( array( 'title', 'php', 'wp', 'file' ) as $setting ) {
if ( isset( $args[$setting] ) ) {
$this->$setting = $args[$setting];
}
}
}
public function passes() {
$passes = $this->php_passes() && $this->wp_passes();
if ( ! $passes ) {
add_action( 'admin_notices', array( $this, 'deactivate' ) );
}
return $passes;
}
public function deactivate() {
if ( isset( $this->file ) ) {
deactivate_plugins( plugin_basename( $this->file ) );
}
}
private function php_passes() {
if ( $this->__php_at_least( $this->php ) ) {
return true;
} else {
add_action( 'admin_notices', array( $this, 'php_version_notice' ) );
return false;
}
}
private static function __php_at_least( $min_version ) {
return version_compare( phpversion(), $min_version, '>=' );
}
public function php_version_notice() {
echo '<div class="error">';
echo "<p>The &#8220;" . esc_html( $this->title ) . "&#8221; plugin cannot run on PHP versions older than " . $this->php . '. Please contact your host and ask them to upgrade.</p>';
echo '</div>';
}
private function wp_passes() {
if ( $this->__wp_at_least( $this->wp ) ) {
return true;
} else {
add_action( 'admin_notices', array( $this, 'wp_version_notice' ) );
return false;
}
}
private static function __wp_at_least( $min_version ) {
return version_compare( get_bloginfo( 'version' ), $min_version, '>=' );
}
public function wp_version_notice() {
echo '<div class="error">';
echo "<p>The &#8220;" . esc_html( $this->title ) . "&#8221; plugin cannot run on WordPress versions older than " . $this->wp . '. Please update WordPress.</p>';
echo '</div>';
}
}

Reach out on Twitter and let me know what methods you use to manage PHP and WordPress versions in your plugin!


Do you need WordPress services?

Mark runs Covered Web Services which specializes in custom WordPress solutions with focuses on security, speed optimization, plugin development and customization, and complex migrations.

Please reach out to start a conversation!

Updating plugins using Git and WP-CLI

Now that you know how I deploy WordPress sites and how I configure WordPress environments, what about the maintenance of keeping a WordPress site’s plugins up-to-date?

Since I’m using Git, I cannot use WordPress built-in plugin updater on the live site (and I wouldn’t want to — if a plugin update goes wrong, my live site could be in trouble!)

The simple way to update all your plugins from a staging or local development site is to use WP-CLI:

wp plugin update-all
git commit -am 'update all plugins' wp-content/plugins

That works. I used to do that.

I don’t do that anymore.

Why? Granularity.

One of the benefits of using version control like Git is that when things go wrong, you can pinpoint when they went wrong, and identify what code caused the issue.

Git has a great tool called bisect that takes a known good state in the past and a current broken state, and then jumps around between revisions, efficiently, asking you to report whether that revision is good or bad. Then it tells you what revision broke your site.

If you lump all your plugin updates into one commit, you won’t get that granularity. You’ll likely get the git bisect result of “great… one of EIGHTEEN PLUGINS I updated was the issue”. That doesn’t help.

Here’s how you do it with granularity:

for plugin in $(wp plugin list --update=available --field=name);
do
    wp plugin update $plugin &&
    git add -A wp-content/plugins/$plugin &&
    git commit -m 'update $plugin plugin'
done;

This code loops through plugins with updates available, updates each one, and commits it with a message that references the plugin being updated. Great! Now git bisect will be able to tell you which plugin update broke your site.

And what if you can only run WP-CLI commands from within a VM, and Git commands from your local machine? For instance, if you’re using my favorite tool, Local by Flywheel, you have to SSH into the site’s container to issue WP-CLI commands, but from within that container, you might not have Git configured like it is on your host machine.

So what you can do is break the process into two steps.

On the VM, run this:

wp plugin list --update=available --field=name > plugins.txt
wp plugin update-all

That grabs a list of plugins with updates and writes them to a file plugins.txt, and then updates all the plugins.

And then on your local machine, run this:

while read plugin;
do
    git add -A wp-content/plugins/$plugin &&
    git commit -m 'update $plugin plugin'
done; < plugins.txt

That slurps in that list of updated plugins and does a distinct git add and git commit for each.

When that’s done, remove plugins.txt.

All your plugins are quickly updated with WP-CLI, but you get nice granular Git commits and messages.


Do you need WordPress services?

Mark runs Covered Web Services which specializes in custom WordPress solutions with focuses on security, speed optimization, plugin development and customization, and complex migrations.

Please reach out to start a conversation!

Tips for configuring WordPress environments

Many WordPress hosts will give your site a “staging” environment. You can also use tools like Local by Flywheel, or MAMP Pro to run a local “dev” version of your site. These are great ways of testing code changes, playing with new plugins, or making theme tweaks, without risking breaking your live “production” site.

Here is my advice for working with different WordPress environments.

Handling Credentials

The live (“production”) version of your site should be opt-in. That is, your site’s Git repo should not store production credentials in wp-config.php. You don’t want something to happen like when this developer accidentally connected to the production database and destroyed all the company data on his first day.

Instead of keeping database credentials in wp-config.php, have wp-config.php look for a local-config.php file. Replace the section that defines the database credentials with something like this:

if ( file_exists( __DIR__ . '/local-config.php' ) ) {
    include( __DIR__ . '/local-config.php' );
} else {
    die( 'local-config.php not found' );
}

Make sure you add local-config.php to your .gitignore so that no one commits their local version to the repo.

On production, you’ll create a local-config.php with production credentials. On staging or development environments, you’ll create a local-config.php with the credentials for those environments.

Production is a Choice

Right after the section that calls out local-config.php, put something like this:

if ( ! defined( 'WP_ENVIRONMENT' ) ) {
    define( 'WP_ENVIRONMENT', 'development' );
}

The idea here is that there will always be a WP_ENVIRONMENT constant available to you that tells you what kind of environment your site is being run in. In production, you will put this in local-config.php along with the database credentials:

define( 'WP_ENVIRONMENT', 'production' );

Now, in your theme, or your custom plugins, or other code, you can do things like this:

if ( 'production' === WP_ENVIRONMENT ) {
    add_filter( 'option_gravityformsaddon_gravityformsstripe_settings', function( $stripe_settings ) {
        $stripe_settings['api_mode'] = 'live';
        return $stripe_settings;
    });
} else {
    add_filter( 'option_gravityformsaddon_gravityformsstripe_settings', function( $stripe_settings ) {
        $stripe_settings['api_mode'] = 'test';
        return $stripe_settings;
    });
}

This bit of code is for the Easy Digital Downloads Stripe gateway plugin. It makes sure that on the production environment, the payment gateway is always in live mode, and the anywhere else, it is always in test mode. This protects against two very bad situations: connecting to live services from a test environment (which could result in customers being charged for test transactions) and connecting to test services from a live environment (which could prevent customers from purchasing products on your site).

You can also use this pattern to do things like hide Google Analytics on your test sites, or make sure debug plugins are only active on development sites (more on that, in a future post!)

Don’t rely on complicated procedures (“step 34: make sure you go into the Stripe settings and switch the site to test mode on your local test site”) — make these things explicit in code. Make it impossible to screw it up, and working on your sites will become faster and less stressful.


Do you need WordPress services?

Mark runs Covered Web Services which specializes in custom WordPress solutions with focuses on security, speed optimization, plugin development and customization, and complex migrations.

Please reach out to start a conversation!

Simple WordPress deploys using Git

A few weeks back, Clifton Griffin asked me a question about deploying WordPress sites:

I do not use Capistrano for deployments anymore, for one simple reason: it was massive overkill for most of the sites I manage, and maintaining it was not worth the benefit.

My current deployment system for WordPress sites is simple: I use Git.

I’m already using Git for version control of the site’s code, so using Git for deployments is not that much more work. There are a few ways to do this, but the simplest way is to just make your site root a Git checkout of your site files.

Then, if your server has read-access to your Git remote, you can run some Git commands to sync everything. Here are your options:

  1. git pull — Simple, but might fail if someone naughty has made code modifications on the server.
  2. git fetch && git reset –hard origin/master — The hard reset method will wipe any local modifications that someone has mistakenly made.

But wait. Before you implement this, it is very important that you ensure that your server’s .git directory is not readable, as it might be able to leak sensitive information about your site’s code. How you do this will depend on what web server you’re running. In Nginx, I do the following:

location ~ /\.(ht[a-z]+|git|svn) {
deny all;
}

In Apache, you could put the following in your .htaccess file:

RedirectMatch 404 /\.git

SSHing into your server every time is tedious, so let’s script that:

#!/bin/bash
ssh example.com 'cd /srv/www/example.com && git pull'

Save that to deploy.sh in your Git repo, run chmod +x deploy.sh, and commit it to the repo. Now when you’re ready to deploy the site, just type ./deploy.sh and the public site will pull down the latest changes from your main Git remote.

Bonus points if you make deploy.sh take an optional commit hash, so you can also use this tool to roll back to a previous hash, in case a commit goes wrong.

This method has served me well, for years, and has required no maintenance.

What methods are you using for WordPress code deploys?


Do you need WordPress services?

Mark runs Covered Web Services which specializes in custom WordPress solutions with focuses on security, speed optimization, plugin development and customization, and complex migrations.

Please reach out to start a conversation!

How I fixed Yoast SEO sitemaps on a large WordPress site

One of my Covered Web Services clients recently came to me with a problem: Yoast SEO sitemaps were broken on their largest, highest-traffic WordPress site. Yoast SEO breaks your sitemap up into chunks. On this site, the individual chunks were loading, but the sitemap index (its “table of contents”) would not load, and was giving a timeout error. This prevented search engines from finding the individual sitemap chunks.

Sitemaps are really helpful for providing information to search engines about the content on your site, so fixing this issue was a high priority to the client! They were frustrated, and confused, because this was working just fine on their other sites.

Given that this site has over a decade of content, I figured that Yoast SEO’s dynamic generation of the sitemap was simply taking too long, and the server was giving up.

So I increased the site’s various timeout settings to 120 seconds.

No good.

I increased the timeout settings to 300 seconds. Five whole minutes!

Still no good.

This illustrates one of the problems that WordPress sites can face when they accumulate a lot of content: dynamic processes start to take longer. A process that takes a reasonable 5 seconds with 5,000 posts might take 100 seconds with 500,000 posts. I could have eventually made the Yoast SEO sitemap index work if I increased the timeout high enough, but that wouldn’t have been a good solution.

  1. It would have meant increasing the timeout settings irresponsibly high, leaving the server potentially open to abuse.
  2. Even though it is search engines, not people, who are requesting the sitemap, it is unreasonable to expect them to wait over 5 minutes for it to load. They’re likely to give up. They might even penalize the site in their rankings for being slow.

I needed the sitemap to be reliably generated without making the search engines wait.

When something intensive needs to happen reliably on a site, look to the command line.

The Solution

Yoast SEO doesn’t have WP-CLI (WordPress command line interface) commands, but that doesn’t matter — you can just use wp eval to run arbitrary WordPress PHP code.

After a little digging through the Yoast SEO code, I determined that this WP-CLI command would output the index sitemap:

wp eval '
$sm = new WPSEO_Sitemaps;
$sm->build_root_map();
$sm->output();
'

That took a good while to run on the command line, but that doesn’t matter, because I just set a cron job to run it once a day and save its output to a static file.

0 3 * * * cd /srv/www/example.com && /usr/local/bin/wp eval '$sm = new WPSEO_Sitemaps;$sm->build_root_map();$sm->output();' > /srv/www/example.com/wp-content/uploads/sitemap_index.xml

The final step that was needed was to modify a rewrite in the site’s Nginx config that would make the /sitemap_index.xml path point to the cron-created static file, instead of resolving to Yoast SEO’s dynamic generation URL.

location ~ ([^/]*)sitemap(.*).x(m|s)l$ {
    rewrite ^/sitemap.xml$ /sitemap_index.xml permanent;
    rewrite ^/([a-z]+)?-?sitemap.xsl$ /index.php?xsl=$1 last;
    rewrite ^/sitemap_index.xml$ /wp-content/uploads/sitemap_index.xml last;
    rewrite ^/([^/]+?)-sitemap([0-9]+)?.xml$ /index.php?sitemap=$1&sitemap_n=$2 last;
}

Now the sitemap index loads instantly (because it’s a static file), and is kept up-to-date with a reliable background process. The client is happy that they didn’t have to switch SEO plugins or install a separate sitemap plugin. Everything just works, thanks to a little bit of command line magic.

What other WordPress processes would benefit from this kind of approach?


Do you need WordPress services?

Mark runs Covered Web Services which specializes in custom WordPress solutions with focuses on security, speed optimization, plugin development and customization, and complex migrations.

Please reach out to start a conversation!

The 4 best WordPress hosts of 2016

As a seasoned WordPress developer, I am frequently asked what WordPress web hosts I recommend. There are so many solid choices now! The WordPress ecosystem is truly a bounty of choice in 2016. I could write an exhaustive comparison of all of the options, but these are called “exhaustive comparisons” for a reason. Let’s skip that, and I’ll just tell you the four WordPress hosts I recommend in five distinct tiers.

Note that many of these hosts target a range of sites, from starter sites to enterprise sites, so I am picking the hosts that I think fit each tier of site best, even though they might also work for other kinds of sites.

Starter Site

SiteGround is one of my favorite WordPress hosting companies. They offer a range of hosting solutions, but their WordPress-tailored plans are a tremendously good value and have many WordPress-specific perks. Ask around the WordPress community — SiteGround is a well-respected company that works hard to win and retain the business of WordPress customers. Their plans start as low as $3.95 a month, which is an incredibly good deal. If you aren’t sure what you need, SiteGround is what I would choose.

Take a look at SiteGround’s WordPress hosting plans.

Developer-Friendly Site

What if you know your way around WordPress, want things like Git and WP-CLI access, or want advanced WordPress-friendly caching for your site? SiteGround has you covered there, too. Their GoGeek plan (currently $14.95 a month) offers all of these perks, unlimited sites, WordPress staging sites, and so much more. I love working with GoGeek-level SiteGround sites, because they work really well and give me access to all the tools that I need as a developer. Or, if you’re not a developer, but have hired one to work on your site, you may want to upgrade to GoGeek hosting so she can work at maximum efficiency.

Go sign up for SiteGround’s GoGeek WordPress hosting.

Intermediate Site

WP Engine has been around since 2010, focuses entirely on WordPress hosting, and has established themself as a solid choice in the intermediate range. Their plans start at $29/month and include a 60-day money-back guarantee and free automated migration of your existing WordPress site. WP Engine also has more advanced hosting options, so they’re an option that could grow with you.

Sign up for WP Engine using this link and you’ll save 20% off your first payment.

Professional Site

Pantheon got their start as a Drupal host, but have taken their innovative container-based hosting technology to the WordPress market. As a developer, I appreciate their Git-based development flow, their powerful “Terminus” command line client, and their built-in and dead-simple dev/test/live environments. On the higher level plans, you get “Multidev” which lets you spin up a sandboxed development environment for a specific Git branch. This means you can send clients and testers URLs for testing new features in isolation, before they are merged back into the main code branch. Awesome.

Their professional tier starts at $100/month, which isn’t cheap, but your developers will love their deployment tools, their dev/test/live code staging flows, and their Git-based deploys to the development environment. Pantheon is a great choice for professional WordPress sites that have a developer on staff or on retainer.

Check out Pantheon’s professional WordPress hosting plans.

Enterprise Site

Pagely has been around since 2006! They started the whole WordPress-dedicated hosting marketplace. When they started, they targeted a range of WordPress sites, but now they focus on enterprise hosting. This is where big brands go for custom WordPress hosting solutions. The folks at Pagely know WordPress well, and will be an excellent hosting partner for your enterprise WordPress site. Their VPS solutions start at $499/month, but they also have a shared server plan called Neutrino for $99/month.

Get started with Pagely enterprise hosting.

How I Picked

My method here was simple. I thought about how I answer if a friend or a client asks me for hosting advice. I found that I regarded sites as fitting in one of five categories. Then, I considered which hosts offer the best service and value in those categories, and picked these four hosts. After I had made my picks and written about their benefits, I went to see which of my picks had affiliate programs. Three of them did, and one did not. I used affiliate links for those that offered them, and a direct link for the one that did not. Using affiliate links to sign up for their service will earn me some money, but you can of course just go directly to their sites if you like. I stand by these recommendations, either way. I’ll write a new post in 2017 with my new picks. Let me know on Twitter what hosts are your favorites, and why!

Tips for Hosting WordPress on Pantheon

Pantheon has long been hosting Drupal sites, and their entry into the WordPress hosting marketplace is quite welcome. For the most part, hosting WordPress sites on Pantheon is a dream for developers. Their command line tools and git-based development deployments, and automatic dev, test, live environments (with the ability to have multiple dev environments on some tiers) are powerful things. If you can justify the expense (and they’re not cheap), I would encourage you to check them out.

First, the good stuff:

Git-powered dev deployments

This is great. Just add their Git repo as a remote (you can still host your code on GitHub or Bitbucket or anywhere else you like), and deploying to dev is as simple as:

git push pantheon-dev master

Command-line deployment to test and live

Pantheon has a CLI tool called Terminus that can be used to issue commands to Pantheon (including giving you access to remote WP-CLI usage).

You can do stuff like deploy from dev to test:

terminus site deploy --site=YOURSITE --env=test --from=dev --cc

Or from test to live:

terminus site deploy --site=YOURSITE --env=live --from=test

Clear out Redis:

terminus site redis clear --site=YOURSITE --env=YOURENV

Clear out Varnish:

terminus site clear-caches --site=YOURSITE --env=YOURENV

Run WP-CLI commands:

terminus wp option get blogname --site=YOURSITE --env=YOURENV

Keep dev and test databases & uploads fresh

When you’re developing in dev or testing code in test before it goes to live, you’ll want to make sure things work with the latest live data. On Pantheon, you can just go to Workflow > Clone, and easily clone the database and uploads (called “files” on Pantheon) from live to test or dev, complete with rewriting of URLs as appropriate in the database.

No caching plugins

You can get rid of Batcache, W3 Total Cache, or WP Super Cache. You don’t need them. Pantheon caches pages outside of WordPress using Varnish. It just works (including invalidating URLs when you publish new content). But what if you want some control? Well, that’s easy. Just issue standard HTTP cache control headers, and Varnish will obey.

<?php

function my_pantheon_varnish_caching() {
	if ( is_user_logged_in() ) {
		return;
	}
	$age = false;

	// Home page: 30 minutes
	if ( is_home() && get_query_var( 'paged' ) < 2 ) {
		$age = 30;
	// Product pages: two hours
	} elseif ( function_exists( 'is_product' ) && is_product() ) {
		$age = 120;
	}

	if ( $age !== false ) {
		pantheon_varnish_max_age( $age );
	}
}

function pantheon_varnish_max_age( $minutes ) {
	$seconds = absint( $minutes ) * 60;
	header( 'Cache-Control: public, max-age=' . $seconds );
}

add_action( 'template_redirect', 'my_pantheon_varnish_caching' );

And now, some unclear stuff:

Special wp-config.php setup

Some things just aren’t very clear in Pantheon’s documentation, and using Redis for object caching is one of them. You’ll have to do a bit of work to set this up. First, you’ll want to download the wp-redis plugin and put its object-cache.php file into /wp-content/.

Update: apparently this next step is not needed!

Next, modify your wp-config.php with this:

// Redis
if ( isset( $_ENV['CACHE_HOST'] ) ) {
	$GLOBALS['redis_server'] = array(
		'host' => $_ENV['CACHE_HOST'],
		'port' => $_ENV['CACHE_PORT'],
		'auth' => $_ENV['CACHE_PASSWORD'],
	);
}

Boom. Now Redis is now automatically configured on all your environments!

Setting home and siteurl based on the HTTP Host header is also a nice trick for getting all your environments to play, but beware yes-www and no-www issues. So as to not break WordPress’ redirection between those variants, you should massage the Host to not be solidified as the one you don’t want:

// For non-www domains, remove leading www
$site_server = preg_replace( '#^www\.#', '', $_SERVER['HTTP_HOST'] );

// You're on your own for the yes-www version 🙂

// Set URLs
define( 'WP_HOME', 'http://'. $site_server );
define( 'WP_SITEURL', 'http://'. $site_server );

So, those environment variables are pretty cool, huh? There are more:

// Database
define( 'DB_NAME', $_ENV['DB_NAME'] );
define( 'DB_USER', $_ENV['DB_USER'] );
define( 'DB_PASSWORD', $_ENV['DB_PASSWORD'] );
define( 'DB_HOST', $_ENV['DB_HOST'] . ':' . $_ENV['DB_PORT'] );

// Keys
define( 'AUTH_KEY', $_ENV['AUTH_KEY'] );
define( 'SECURE_AUTH_KEY', $_ENV['SECURE_AUTH_KEY'] );
define( 'LOGGED_IN_KEY', $_ENV['LOGGED_IN_KEY'] );
define( 'NONCE_KEY', $_ENV['NONCE_KEY'] );

// Salts
define( 'AUTH_SALT', $_ENV['AUTH_SALT'] );
define( 'SECURE_AUTH_SALT', $_ENV['SECURE_AUTH_SALT'] );
define( 'LOGGED_IN_SALT', $_ENV['LOGGED_IN_SALT'] );
define( 'NONCE_SALT', $_ENV['NONCE_SALT'] );

That’s right — you don’t need to hardcode those values into your wp-config. Let Pantheon fill them in (appropriate for each environment) for you!

And now, some gotchas:

Lots of uploads = lots of problems

Pantheon has a distributed filesystem. This makes it trivial for them to scale your site up by adding more Linux containers. But their filesystem does not like directories with a lot of files. So, let’s consider the WordPress uploads folder. Usually this is partitioned by month. On Pantheon, if you start approaching 10,000 files in a directory, you’re going to have problems. Keep in mind that crops count towards this limit. So one upload with 9 crops is 10 files. 1000 uploads like that in a month and you’re in trouble. I would recommend splitting uploads by day instead, so the Pantheon filesystem isn’t strained. A plugin like this can help you do that.

Sometimes notices cause segfaults

I honestly don’t know what is going on here, but I’ve seen E_NOTICE errors cause PHP segfaults. Being segfaults, they produce no useful information in logs, and I’ve had to spend hours tracking down the code causing the issue. This happens reliably for given code paths, but I don’t have a reproducible example. It’s just weird. I have a ticket open with Pantheon about this. It’s something in their custom error handling. Until they get this fixed, I suggest doing something like this, in the first line of wp-config.php:

// Disable Pantheon's error handler, which causes segfaults
function disable_pantheon_error_handler() {
	// Does nothing
}

if ( isset( $_ENV['PANTHEON_ENVIRONMENT'] ) ) {
	set_error_handler( 'disable_pantheon_error_handler' );
}

This just sets a low level error handler that stops errors from bubbling up to PHP core, where the trouble likely lies. You can still use something like Debug Bar to show errors, or you could modify that blank error handler to write out to an error log file.

Have your own tips?

Do you have any tips for hosting WordPress on Pantheon? Let me know in the comments!

Introducing Cache Buddy: a companion for your WordPress page caching solution

WordPress is, by default, completely dynamic. On every page load, a bunch of “work” happens. Cookies are read. A database is queried. Content is transformed. All of this makes WordPress very powerful and flexible. But for sites that get a lot of traffic and mostly just need to crank out the same pages for everyone, this dynamic nature can become a challenge.

The common solution to this is to layer a page cache on top of WordPress. Batcache, W3 Total Cache, and WP Super Cache are examples of page caches built as WordPress plugins. Varnish, Nginx fastcgi caching, and CDNs like Akamai or Cloudflare are examples of page caching that happens outside of the WordPress layer. They store the HTML that WordPress generates for a given URL and then store it for later, so that when people request that URL in the future, they can just get the cached version, for little or no work on WordPress’ part.

But these page caching solutions all share the same downside: they can’t cache pages for logged-in WordPress users or users with WordPress comment cookies. Why not? Well, because WordPress looks at these cookies and alters the page based on them. A logged in user will see the WordPress toolbar at the top, which is customized to them. Users with more privileges might see “edit” links next to content that they can edit. And returning commenters will see their name, e-mail, and URL helpfully filled in to comment forms. All these things change the output of the page, such that it wouldn’t be worth it for a page cache to hold on to that page — it would only be of use to the individual visitor who triggered it. So all of these page caching solutions have rules that make them “skip” the page cache if a user has a WordPress comment cookie, or a WordPress user account cookie (and also a post password cookie, though this is an infrequently used feature). If a site has an active commenting community or has open registration (or required registration), this means that a much smaller percentage of page views can be cache hits. Instead, they are the dreaded cache miss, and they fall back to having WordPress generate a dynamic page.

The difference between a cache miss and a cache hit is not small. A cache hit takes minimal effort for the server, and can be delivered to the user much faster. It can be the difference between 1 second and 0.002 seconds. Five hundred times slower. Dynamic views keep the server connection open for longer, and take up CPU cycles. This can snowball under heavy load. Pages start taking longer, and because they start taking longer, less CPU is available. Eventually they can time out, or the server can run out of connections. Not good. You want cache hits, during a situation like this, but if the traffic isn’t anonymous (non-comment-cookie, non-logged-in-cookie), the available caching solutions just give up.

I’ve been solving this issue for years with custom caching solutions that strip the customizations from the page, so that the cache can be configured to serve one static page to everyone. Now, I’ve moved these techniques into a plugin, and I’m calling it Cache Buddy.

Cache Buddy works by doing the following:

  1. Changes what paths logged-in cookies are set for (so they work in the WordPress backend, but don’t exist on the front of the site).
  2. Sets custom cookies with relevant information about the logged-in user, on the front of the site, making these cookies JavaScript-readable.
  3. Sets custom cookies for commenters (again, JavaScript-readable), and doesn’t set the normal WordPress comment cookies.
  4. Uses the information from these JavaScript cookies, plus some comment form magic, to recreate the comment form experience users would get from a dynamic page.

This means that you can log in to WordPress, and then go a view a post’s comment form, and see “You are logged in as Mark. Log out?”. Or you can be a non-account-having commenter who has commented, and your information will be filled in. Or maybe the site requires registration, and you’re not signed in. You’ll see the normal prompt to sign in. But here’s the kicker: all of these pages are the same page, and will be cached by page caching solutions. The customizations are all done in JavaScript, using the custom (and unknown to WordPress-optimized page caches) cookies that Cache Buddy sets.

What about the toolbar?

Well, by default, Subscriber and Contributor users won’t see it. But it honestly isn’t very useful to them anyway. But Authors, Editors and Administrators (who should be a very small percentage of viewers) will still get dynamic page views like they do now, and they’ll see the toolbar.

What about BuddyPress?

Good luck. Some plugins customize the page so much that all views really do need to be dynamic. Object Caching is your friend, for these cases.

Is this for every site?

No. If you have a BuddyPress site or an e-commerce site, you may honestly need WordPress logged-in cookies available on the front of your site. But if you’re just running a blog/CMS site with a significant number of commenters and logged-in Subscribers, this plugin could massively speed up your site, because requests that had to always be dynamic before, can now be served from a page cache.

What about the “Meta” widget?

Not currently supported, but I’m hoping to add support for it.

What about other logged-in site customizations?

The user will appear to by an anonymous visitor. But you could recreate them in JS by reading the cookies that Cache Buddy sets.

Ask Mark Anything

People ask me a lot of questions. About WordPress and web development for sure, but also about other topics. I’ve decided to try a little experiment: a public way to ask me questions. Zach Holman from GitHub had the idea to use a GitHub issue tracker for this very purpose, and I think it looks like a splendid idea.

Benefits:

  • Allows for more in-depth discussions than Twitter (but you can still talk to me on Twitter for quick questions).
  • Is public (as opposed to e-mail).
  • Forces me to deal with questions.

Now, note that this doesn’t mean I want you to treat me like your personal Google-searcher or WordPress code grepper! But if you think there is a WordPress (or other) topic that I am uniquely qualified to address, just ask.

Don’t use template_redirect to load an alternative template file

template_redirect is a popular WordPress hook, for good reason. When it runs, WordPress has made its main query. All objects have been instantiated, but no output has been sent to the browser. It is your last stop to hook in and redirect the user somewhere else, and the best place to do so if you need full knowledge of the queried objects. But what it is not good for is loading an alternative template.

I see code like this a lot:

add_action( 'template_redirect', 'my_callback' );

function my_callback() {
  if ( some_condition() ) {
    include( SOME_PATH . '/some-custom-file.php' );
    exit();
  }
}

The problem with this code is that anything hooked in to template_redirect after this code isn’t going to run! This can break sites and lead to very odd bugs. If you want to load an alternative template, there’s a filter hook for that: template_include.

add_filter( 'template_include', 'my_callback' );

function my_callback( $original_template ) {
  if ( some_condition() ) {
    return SOME_PATH . '/some-custom-file.php';
  } else {
    return $original_template;
  }
}

Same effect, but doesn’t interfere with other plugin or theme code! This distinction should be easy to remember:

  • template_redirect is for redirects.
  • template_include is for includes.